Showing posts with label Ganglia. Show all posts

Wednesday 4 February 2015

Hadoop Monitoring Using Ganglia

This post is about monitoring the Hadoop metrics such as HDFS, MAPREDUCE, JVM, RPC and UGI using the Ganglia Monitoring Tool.

I assume that the readers of blog have prior knowledge of Ganglia and Hadoop technology.

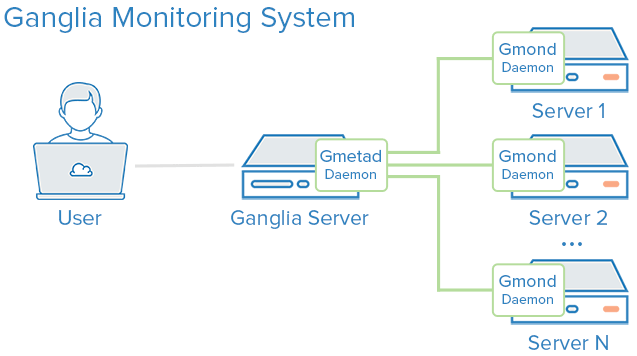
To integrate the Ganglia with Hadoop you need to configure hadoop-metrics.properties file of hadoop located inside the hadoop conf folder. In this configuration file you need to configure the server address of ganglia gmetad, period for sending metrics data and ganglia context class name.

The format and name of hadoop metrics properties file is different for various hadoop versions.
For Hadoop 0.20.x, 0.21.0 and 0.22.0 versions, the file name is hadoop-metrics.properties.
For Hadoop 1.x.x and 2.x.x versions, the file name is hadoop-metrics2.properties.
The ganglia context class name also differs with version change of ganglia, for detailed information about Ganglia Context class you can read from GangliaContext.

Procedure of configuring the hadoop metrics properties file: ---------------------------------------------------------------------------------------------
1. Configuration for 2.x.x versions: In such hadoop versions the metrics properties file is located inside the $HADOOP_HOME/etc/hadoop/ folder. Configure thehadoop-metrics2.properties file using the code as shown below:

namenode.sink.ganglia.class=org.apache.hadoop.metrics2.sink.ganglia.GangliaSink31
namenode.sink.ganglia.period=10
namenode.sink.ganglia.servers=gmetad_server_ip:8649

datanode.sink.ganglia.class=org.apache.hadoop.metrics2.sink.ganglia.GangliaSink31
datanode.sink.ganglia.period=10
datanode.sink.ganglia.servers=gmetad_server_ip:8649

resourcemanager.sink.ganglia.class=org.apache.hadoop.metrics2.sink.ganglia.GangliaSink31
resourcemanager.sink.ganglia.period=10
resourcemanager.sink.ganglia.servers=gmetad_server_ip:8649

nodemanager.sink.ganglia.class=org.apache.hadoop.metrics2.sink.ganglia.GangliaSink31
nodemanager.sink.ganglia.period=10
nodemanager.sink.ganglia.servers=gmetad_server_ip:8649


2. Configuration for 1.x.x versions: In such hadoop versions the metrics properties file is located inside the $HADOOP_HOME/conf/ folder. Configure the hadoop-metrics2.properties file using the code as shown below:

namenode.sink.ganglia.class=org.apache.hadoop.metrics2.sink.ganglia.GangliaSink31
namenode.sink.ganglia.period=10
namenode.sink.ganglia.servers=gmetad_server_ip:8649

datanode.sink.ganglia.class=org.apache.hadoop.metrics2.sink.ganglia.GangliaSink31
datanode.sink.ganglia.period=10
datanode.sink.ganglia.servers=gmetad_server_ip:8649

jobtracker.sink.ganglia.class=org.apache.hadoop.metrics2.sink.ganglia.GangliaSink31
jobtracker.sink.ganglia.period=10
jobtracker.sink.ganglia.servers=gmetad_server_ip:8649

tasktracker.sink.ganglia.class=org.apache.hadoop.metrics2.sink.ganglia.GangliaSink31
tasktracker.sink.ganglia.period=10
tasktracker.sink.ganglia.servers=gmetad_server_ip:8649

maptask.sink.ganglia.class=org.apache.hadoop.metrics2.sink.ganglia.GangliaSink31
maptask.sink.ganglia.period=10
maptask.sink.ganglia.servers=gmetad_server_ip:8649

reducetask.sink.ganglia.class=org.apache.hadoop.metrics2.sink.ganglia.GangliaSink31
reducetask.sink.ganglia.period=10
reducetask.sink.ganglia.servers=gmetad_server_ip:8649


3. Configuration for 0.20.x, 0.21.0 and 0.22.0 versions: In such hadoop versions the metrics properties file is located inside the $HADOOP_HOME/conf/ folder. Configure the hadoop-metrics.properties file using the code as shown below:

dfs.class=org.apache.hadoop.metrics.ganglia.GangliaContext31
dfs.period=10
dfs.servers=gmetad_server_ip:8649

mapred.class=org.apache.hadoop.metrics.ganglia.GangliaContext31
mapred.period=10
mapred.servers=gmetad_server_ip:8649

jvm.class=org.apache.hadoop.metrics.ganglia.GangliaContext31
jvm.period=10
jvm.servers=gmetad_server_ip:8649

rpc.class=org.apache.hadoop.metrics.ganglia.GangliaContext31
rpc.period=10
rpc.servers=gmetad_server_ip:8649

ugi.class=org.apache.hadoop.metrics.ganglia.GangliaContext31
ugi.period=10
ugi.servers=gmetad_server_ip:8649


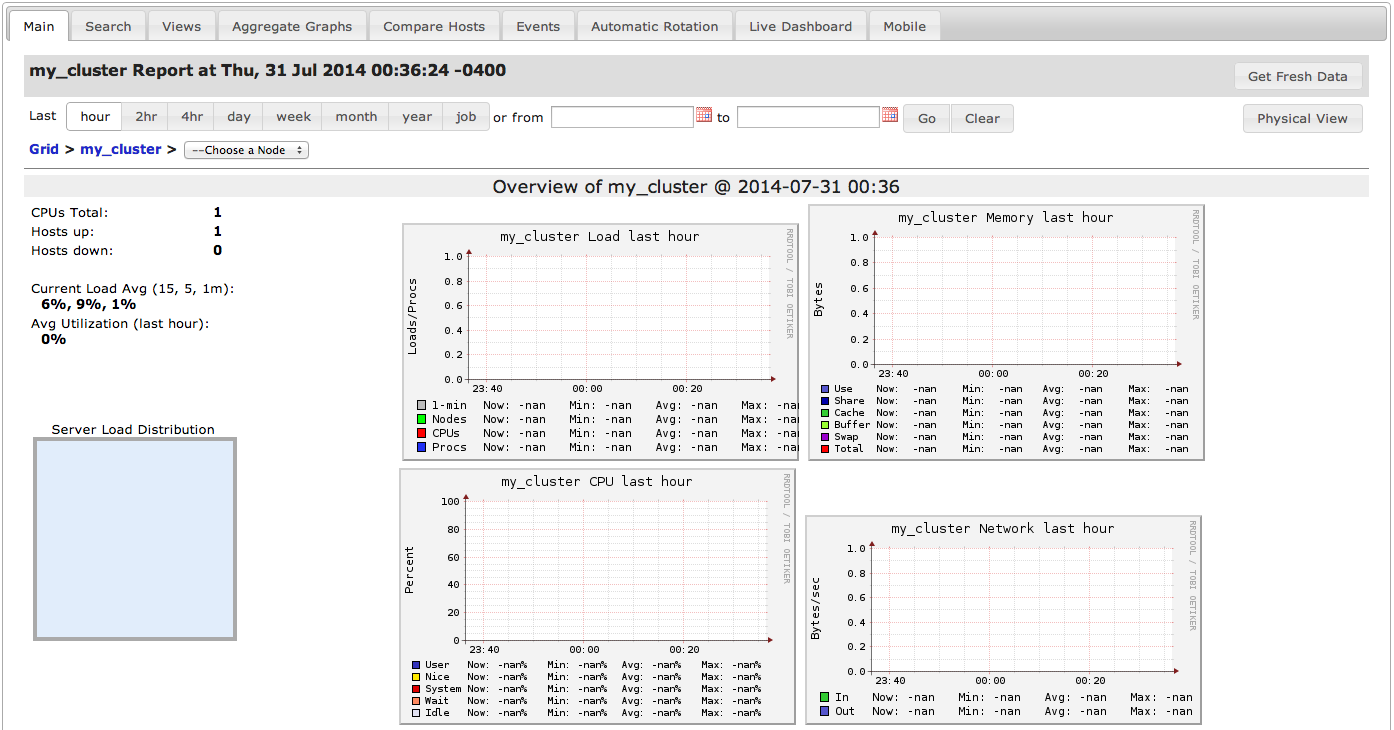
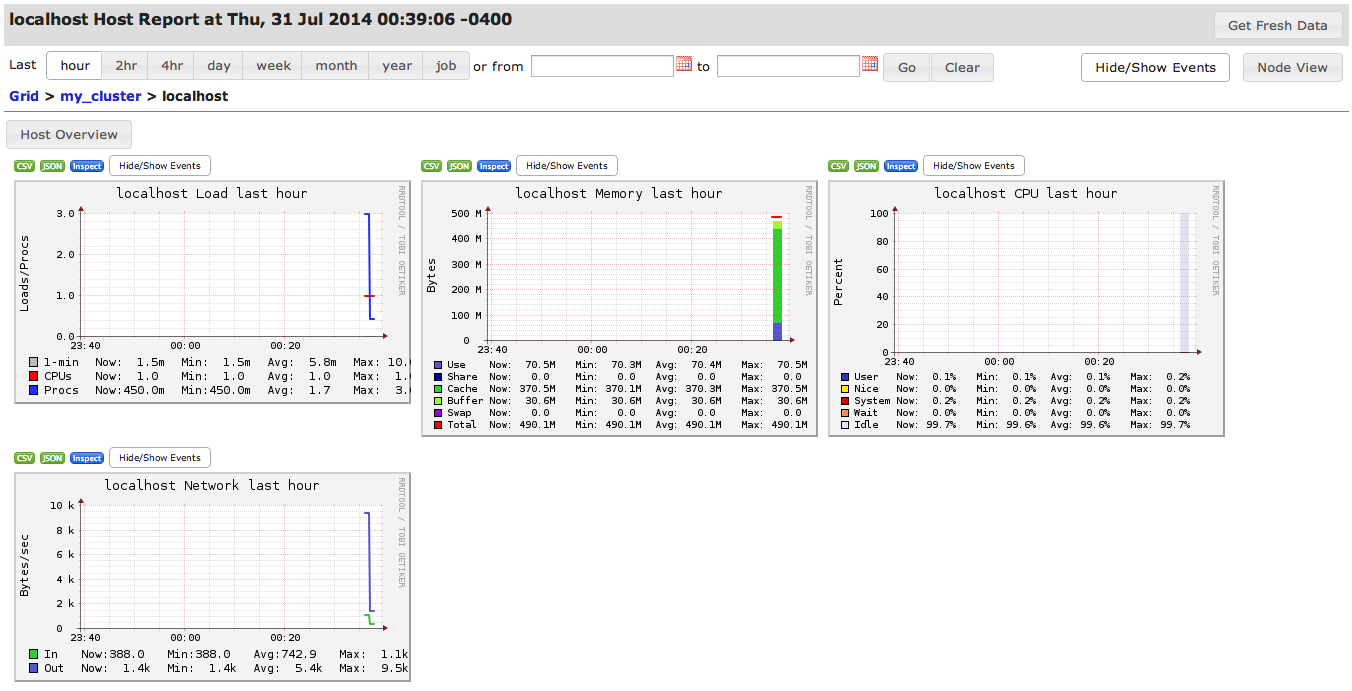
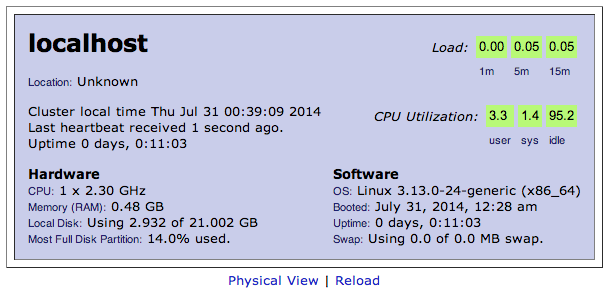
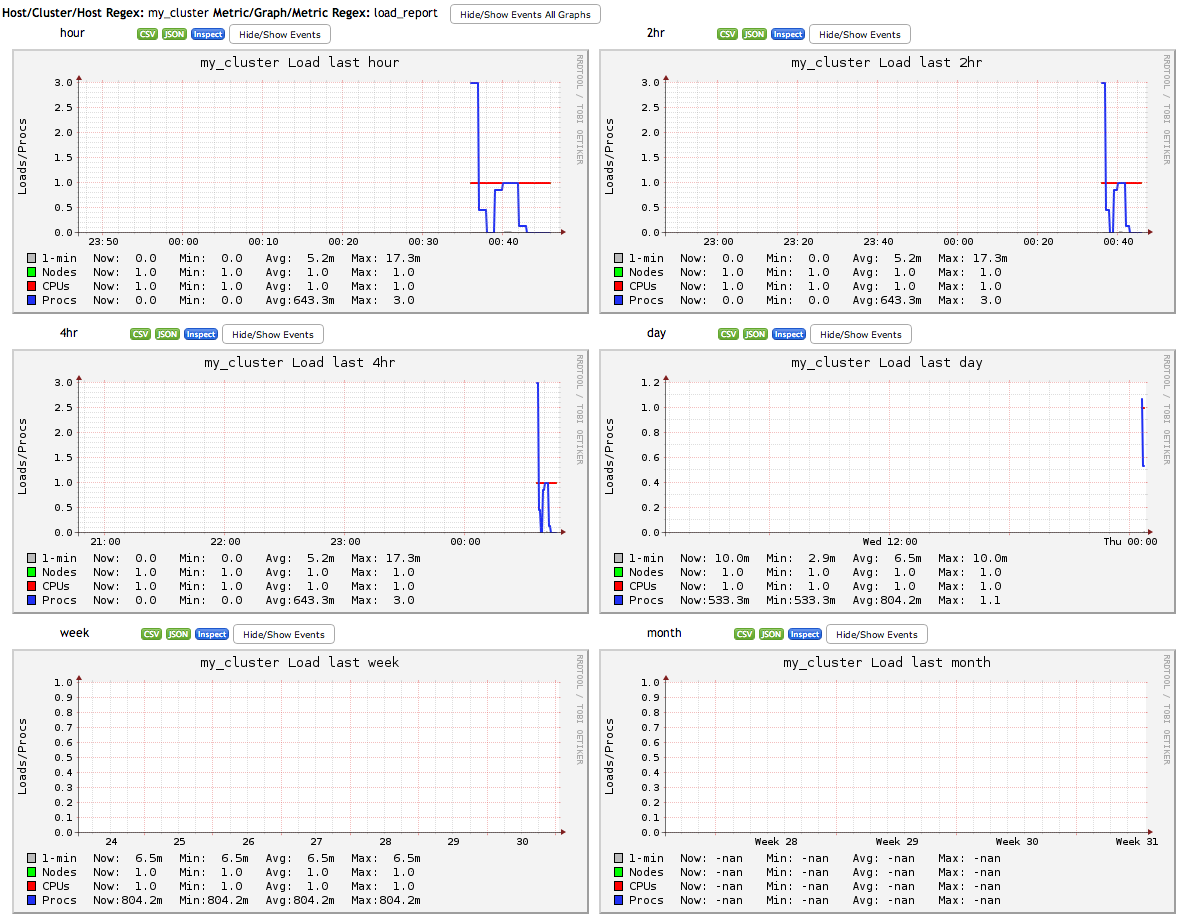
The above configuration is for the unicast mode of Ganglia. However, if you are running Ganglia in multicast mode then you need to use the multicast address in place of gmetad_server_ip in the configuration file. Once you have applied the above changes, then you need to restart the gmetad and gmond services of Ganglia on the nodes. You also need to restart Hadoop services if they are running. Once you are done with restarting the services, the Ganglia UI displays the Hadoop graphs. InitiallyGanglia UI does not show graphs for the jobs, they will appear on UI only after submitting a job in Hadoop.

Introduction to Ganglia on Ubuntu 14.04

Introduction

Ganglia is a scalable distributed monitoring system. It scales well with very large numbers of servers and is useful for viewing performance metrics in near real-time.
On the back end, Ganglia is made up of the following components:
  • Gmond (Ganglia monitoring daemon): a small service that collects information about a node. This is installed on every server you want monitored.
  • Gmetad (Ganglia meta daemon): a daemon on the master node that collects data from all the Gmond daemons (and other Gmetad daemons, if applicable).
  • RRD (Round Robin Database) tool: a tool on the master node used to store data and visualizations for Ganglia in time series.
  • PHP web front-end: a web interface on the master node that displays graphs and metrics from data in the RRD tool.
Basically, every node (server) that you want monitored has Gmond installed. Every node uses Gmond to send data to the single master node running Gmetad, which collects all the node data and sends it to the RRD tool to be stored. You can then view the data in your web browser with the help of the PHP scripts and Apache.
Here's a diagram of a functioning Ganglia grid, with the master node shown as the Ganglia Server running the Gmetad daemon, and the other nodes shown as connecting servers running the Gmond daemon:
Ganglia Architecture
When you use the web interface to view the monitored data, the data is organized on several levels. Ganglia organizes nodes, which are individual monitored machines, into clusters, which are groups of similar nodes. On a higher level, collections of clusters can also be organized into grids. You'll see this organization when you log into the web interface.
In this article, we will first be setting up a single cluster called my cluster, with two nodes. Later, we will set up a single grid named London with two clusters, Servers and Databases. The examples will show two nodes in each cluster.

Prerequisites

You will need:
  • One master node Droplet running Ubuntu 14.04. This is the node you will use to view all of the monitoring data.
  • At least one additional node that you want to monitor, running Ubuntu 14.04
  • If you want to match the grid examples exactly, you should have two more nodes running Ubuntu 14.04. However, you can easily complete the tutorial with just one node on each cluster.
Create a sudo user on each Droplet. First, create the user with the adduser command, replacing the username with the name you want to use.
adduser username
This will create the user and the appropriate home directory and group. You will be prompted to set a password for the new user and confirm the password. You will also be prompted to enter the user's information. Confirm the user information to create the user.
Next, grant the user sudo privileges with the visudo command.
visudo
This will open the /etc/sudoers file. In the User privilege specification section, add another line for the created user so it looks like this (with your chosen username instead of username):
# User privilege specification
root       ALL=(ALL:ALL) ALL
username   ALL=(ALL:ALL) ALL
Save the file and switch to the new user.
su - username
Update and upgrade the system packages.
sudo apt-get update && sudo apt-get -y upgrade

Installation

On the master node, install Ganglia monitor, RRDtool, Gmetad, and the Ganglia web front end.
sudo apt-get install -y ganglia-monitor rrdtool gmetad ganglia-webfrontend
During installation, you will be asked to restart Apache. Select yes. Depending on your system, you may be asked twice. Select yes again.
Set up the online graphical dashboard by copying the Ganglia web front end configuration file to the Apache sites-enabled folder.
sudo cp /etc/ganglia-webfrontend/apache.conf /etc/apache2/sites-enabled/ganglia.conf
Optional: You may want to password-protect this site for increased security. Otherwise, it will be open to the Internet, and you may not wish to expose your server configurations and IP addresses.
Note: This section and the Client Installation section show a simpler setup involving a single cluster, named my cluster. If you want to set up the grid and both clusters right away, you may want to reference the settings in the Grids section as well.
Edit the Gmetad configuration file to set up your cluster. This file configures where and how the Getad daemon will collect data.
sudo vi /etc/ganglia/gmetad.conf
Find the line that begins with data_source, as shown below:
data_source "my cluster" localhost
Edit the data_source line to list the name of your cluster, the data collection frequency in seconds, and your server's connection information. In the example below, the data source is called my cluster, and it collects metrics once a minute from the localhost (itself). You can add more data_source lines to create as many clusters as you want.
data_source "my cluster" 60 localhost
Save your changes.
Next, edit the Gmond configuration file. Even though this is the master node, we are also setting it up for monitoring as the first node in the "my cluster" cluster. The gmond.conf file configures where the node sends its information.
sudo vi /etc/ganglia/gmond.conf
In the cluster section, make sure you set the name to the same one you set in the gmetad.conf file, which in this example is my cluster. The rest of the fields are optional and can be left asunspecified.
For reference, the owner value specifies the administrator of the cluster, which is useful for contact purposes. The latlong value sets the latitude and longitude coordinates for globally distributed clusters. The url value is for a link to provide more information about the cluster.
[...]
cluster {
  name = "my cluster" ## use the name from gmetad.conf
  owner = "unspecified"
  latlong = "unspecified"
  url = "unspecified"
}
[...]
In the udp_send_channel section, insert a new host line with the value localhost, which is the server where you're sending the information. Comment out the mcast_join line.
For reference, the mcast_join value provides a multicast address, but we need to send the data to only one host, so this is unnecessary. (If you later decide you want to create a grid for this cluster, you will re-enable it.)
[...]
udp_send_channel   {
  #mcast_join = 239.2.11.71 ## comment out
  host = localhost
  port = 8649
  ttl = 1
}
[...]
In the udp_recv_channel section, comment out the mcast_join and bind lines. (Again, if you want to add this cluster to a grid, you will re-enable these lines.)
The bind value provides a local address to bind to, but since the cluster will only be sending information, this is unncessary.
[...]
udp_recv_channel {
  #mcast_join = 239.2.11.71 ## comment out
  port = 8649
  #bind = 239.2.11.71 ## comment out
}

/* You can specify as many tcp_accept_channels as you like to share
   an xml description of the state of the cluster */
tcp_accept_channel {
  port = 8649
}
[...]
Restart Ganglia-monitor, Gmetad and Apache.
sudo service ganglia-monitor restart && sudo service gmetad restart && sudo service apache2 restart

Web Interface

Ganglia should now be set up and accessible at http://ip-address/ganglia.
The main page shows the grid view, which is an overview of your monitored nodes. Right now there should be just one: localhost.
Ganglia Web
The main tab allows you to view the data from set and custom time increments. You can also manually refresh the data by clicking the Get Fresh Data button in the top right.
Ganglia Time
Below the time range selection, you can choose a specific node from the dropdown menu labeled --Choose a Node. Right now, localhost should be the only node you see.
Ganglia Node
Select localhost from the list to see information specific to the localhost node. Since localhost is the only node being monitored, the information on the localhost node page and the main tab will be the same.
Ganglia Localhost
From here, you can also click the Node View button in the upper right to view contextual information about the node.
Ganglia Node View
The rest of the main page displays a summary of the node's clusters. Click on any graph to view detailed information by various time increments, from one hour to one year, as well as to export graph data in CSV or JSON formats.
Ganglia Detail
As your nodes grow and viewing them all on the main page becomes difficult, you can use the search tab to find particular hosts or metrics, using regular expressions. You can also compare hosts, create custom aggregate graphs, and more.

Client Installation

On the second node you want to monitor in the my cluster cluster, install the Ganglia monitor.
sudo apt-get install -y ganglia-monitor
Edit the Gmond configuration file for monitoring the node.
sudo vi /etc/ganglia/gmond.conf
Just like we did on the master node, update the cluster name (my cluster in this example) in thecluster section so it matches the name on the master node.
[...]
cluster {
  name = "my cluster"     ## Cluster name
  owner = "unspecified"
  latlong = "unspecified"
  url = "unspecified"
[...]
Add a line to the udp_send_channel block for the host, which should be the IP address of your master Ganglia node (e.g. 1.1.1.1). Comment out the mcast_join line.
[...]
udp_send_channel {
  #mcast_join = 239.2.11.71   ## Comment
  host = 1.1.1.1   ## IP address of master node
  port = 8649
  ttl = 1
}
[...]
Comment out the whole udp_recv_channel section with the /* ... */ syntax, as this server won't be receiving anything.
[...]
/* You can specify as many udp_recv_channels as you like as well.
udp_recv_channel {
  mcast_join = 239.2.11.71
  port = 8649
  bind = 239.2.11.71
}
*/
[...]
Restart the monitoring service.
sudo service ganglia-monitor restart
Wait a few minutes and reload the web interface. The new node should appear in the cluster automatically.
Repeat these steps on any other nodes you want to monitor in this cluster.
You now have a cluster! You can view the overview of your cluster on the web interface, and drill down into specific nodes as well as particular metrics.
Ganglia Cluster

Grids

Grids allow you to organize several clusters together. For instance, if you have several clusters of MySQL databases serving different applications, you can organize all of those clusters in the same grid to view the performance of all your MySQL servers. Or if you have application servers all over the world, you can put them in a grid by location, such as London.
To create a grid, edit the /etc/ganglia/gmetad.conf file on the Ganglia master node.
Please note that you can create only one grid per Gmetad. If you want to create more than one grid you need to install Gmetad on another server. In this example, we will call our grid London.
sudo vi /etc/ganglia/gmetad.conf
Name your grid in the grid section by uncommenting the gridname line and replacing MyGrid with the grid name of your choice. In this example, we will name the grid London.
# The name of this Grid. All the data sources above will be wrapped in a GRID
# tag with this name.
# default: unspecified
# gridname "MyGrid"
For instance, if you are creating your grid for all of your London servers:
gridname "London"
Add or edit a new data_source line for every cluster you want in this grid.
Update the name for the cluster, and then add host and port information for each server you want to add to that cluster. Please note that clusters are identified by the port number, so each new data_sourceline, or cluster, should use a different port number.
For instance, in the example below, we are adding two clusters, called Servers and Databases, to the London grid. All of the nodes in Servers are using port 8556, and all of the nodes in Databases are using port 8857.
data_source "Servers" localhost 1.1.1.2:8556
data_source "Databases" 1.2.1.1:8557 1.2.1.2:8557
On each server (or node) specified in the Gmetad configuration file (in this example, localhost, 1.1.1.2, 1.2.1.1, and 1.2.1.2), edit the Gmond configuration file.
sudo vi /etc/ganglia/gmond.conf
Update the name value in the cluster section to match the cluster name. Here, we'll set up a node to be part of the Databases cluster. (Note that if you set up two nodes using the earlier method, you will have to go back and edit the /etc/ganglia/gmond.conf file on each of them to match the new settings.)
/* If a cluster attribute is specified, then all gmond hosts are wrapped inside
 * of a <CLUSTER> tag.  If you do not specify a cluster tag, then all <HOSTS> will
 * NOT be wrapped inside of a <CLUSTER> tag. */

cluster {
  name = "Databases"
  owner = "unspecified"
  latlong = "unspecified"
  url = "unspecified"
}
Also, unlike in the previous sections, you should not comment out the mcast_join lines.
Your udp_send_channel block should look like this. Make sure to update the port number! In our example, since this is part of the Databases cluster, the port should be 8557. The other lines can stay the same.
udp_send_channel {
mcast_join = 239.2.11.71
port = 8557
ttl = 1
}
Your udp_recv_channel block should look like this, using the appropriate port number. The other lines can stay the same.
udp_recv_channel {
mcast_join = 239.2.11.71
port = 8557
bind = 239.2.11.71
}
Finally, your tcp_accept_channel block should look like this, using the appropriate port number.
tcp_accept_channel {
port = 8557
}
Restart the monitoring services on each node.
sudo service ganglia-monitor restart
Restart Ganglia-monitor, Gmetad and Apache on the Ganglia host server or master node.
sudo service ganglia-monitor restart && sudo service gmetad restart && sudo service apache2 restart
In the web interface, you should now see the name of your grid, and the option to choose a cluster. From there you can select and drill down into a node.
Ganglia Grid

Conclusion

Ganglia is very easy to set up and scale up from one node to hundreds or thousands. It features a high performance level and can help you monitor as many servers as you need.

Tuesday 21 October 2014

Ganglia configuration for a small Hadoop cluster and some troubleshooting

Ganglia is an open-source, scalable and distributed monitoring system for large clusters. It collects, aggregates and provides time-series views of tens of machine-related metrics such as CPU, memory, storage, network usage. You can see Ganglia in action at UC Berkeley Grid.
Ganglia is also a popular solution for monitoring Hadoop and HBase clusters, since Hadoop (and HBase) has built-in support for publishing its metrics to Ganglia. With Ganglia you may easily see the number of bytes written by a particular HDSF datanode over time, the block cache hit ratio for a given HBase region server, the total number of requests to the HBase cluster, time spent in garbage collection and many, many others.

Basic Ganglia overview

Ganglia consists of three components:
  • Ganglia monitoring daemon (gmond) – a daemon which needs to run on every single node that is monitored. It collects local monitoring metrics and announce them, and (if configured) receives and aggregates metrics sent to it from other gmonds (and even from itself).
  • Ganglia meta daemon (gmetad) – a daemon that polls from one or more data sources (a data source can be a gmond or other gmetad) periodically to receive and aggregate the current metrics. The aggregated results are stored in database and can be exported as XML to other clients – for example, the web frontend.
  • Ganglia PHP web frontend – it retrieves the combined metrics from the meta daemon and displays them in form of nice, dynamic HTML pages containing various real-time graphs.
If you want to learn more about gmond, gmetad and the web frontend, a very good description is available at Ganglia’s wikipedia page. Hope, that following picture (showing an exemplary configuration) helps to understand the idea:


In this post I will rather focus on configuration of Ganglia. If you are using Debian, please refer to thefollowing tutorial to install it (just typing a couple of commands). We use Ganglia 3.1.7 in this post.

Ganglia for a small Hadoop cluster

While Ganglia is scalable, distributed and can monitor hundreds and even thousands of nodes, small clusters can also benefit from it (as well as developers and administrators, since Ganglia is a great empirical way to learn Hadoop and HBase internals). In this post I would like to describe how we configured Ganglia on a five-node cluster (1 masters and 4 slaves) that runs Hadoop and HBase. I believe that 5-node cluster (or similar size) is a typical configuration that many companies and organizations start using Hadoop with.
Please note, that Ganglia is flexible enough to be configured in many ways. Here, I will simply describe what final effect I wanted to achieve and how it was done.
Our monitoring requirements can be specified as follows:
  • easily get metrics from every single node
  • easily get agregated metrics for all slave nodes (so that we will know how much resources is used by MapReduce jobs and HBase operations)
  • easily get agregated metrics for all master nodes (so far we have only one master, but when the cluster grows, we will move some master deamons (e.g JobTracker, Secondary Namenode) to separate machines)
  • easily get agregated metrics for all nodes (to get overall state of the cluster)
It means that I want Ganglia to see the cluster as two “logical” subclusters e.g. “masters” and “slaves”. Basically, I wish to see pages like this one:

Possible Ganglia’s configuration

Here is an illustrative picture which shows simple Ganglia’s configuration for 5-node Hadoop cluster that meets our all requirements may look like. So let’s configure it in this way!
Please note, that we would like to keep as many default settings as possible. By default:
  • gmond communicates on UDP port 8649 (specified in udp_send_channel andudp_recv_channel sections in gmond.conf)
  • gmetad downloads metrics on TCP port 8649 (specified in tcp_accept_channel section ingmond.conf, and in data_source entry in gmetad.conf)
However, one setting will be changed. We set the communication method between gmonds to be unicast UDP messages (instead of multicast UDP messages). Unicast has following advantages over multicast: it is better for a larger cluster (say a cluster with more than a hundred of nodes) and it is supported in the Amazon EC2 environment (unlike multicast).

Ganglia monitoring daemon (gmond) configuration

According to the picture above:
  • Every node runs a gmond.
  • Slaves subcluster configuration

  • Each gmond on slave1, slave2, slave3 and slave4 nodes defines udp_send_channel to send metrics to slave1 (port 8649)
  • gmond on slave1 defines udp_recv_channel (port 8649) to listen to incoming metrics andtcp_accept_channel (port 8649) to announce them. This means this gmond is the “lead-node” for this subcluster and collects all metrics sent via UDP (port 8649) by all gmonds from slave nodes (even from itself), which can be polled later via TCP (port 8649) by gmetad.
  • Masters subcluster configuration

  • gmond on master node defines udp_send_channel to send data to master (port 8649),udp_recv_channel (port 8649) and tcp_accept_channel (port 8649). This means it becomes the “lead node” for this one-node cluster and collects all metrics from itself and exposes them to gmetad.
The configuration should be specified in gmond.conf file (you may find it in /etc/ganglia/).
gmond.conf for slave1 (only the most important settings included):
cluster {
  name = "hadoop-slaves"
  ...
}
udp_send_channel {
  host = slave1.node.IP.address
  port = 8649
}
udp_recv_channel {
  port = 8649
}
tcp_accept_channel {
  port = 8649
}
gmond.conf for slave2, slave3, slave4 (actually, the same gmond.conf file as for slave1 can be used as well):
cluster {
  name = "hadoop-slaves"
  ...
}
udp_send_channel {
  host = slave1.node.IP.address
  port = 8649
}
udp_recv_channel {}
tcp_accept_channel {}
The gmond.conf file for the master node should be similar to slave1′s gmond.conf file – just replace slave1′s IP address with master’s IP and set cluster name to “hadoop-masters”.
You can read more about gmond‘s configuration sections and attributes here.

Ganglia meta daemon (gmetad)

gmetad configuration is even simpler:
  • Master runs gmetad
  • gmetad defines two data sources:
data_source "hadoop-masters" master.node.IP.address
data_source "hadoop-slaves" slave1.node.IP.address
The configuration should be specified in gmetad.conf file (you may find it in /etc/ganglia/).

Hadoop and HBase integration with Ganglia

Hadoop and HBase use GangliaContext class to send the metrics collected by each daemon (such as datanode, tasktracker, jobtracker, HMaster etc) to gmonds.
Once you have setup Ganglia successfully, you may want to edit /etc/hadoop/conf/hadoop-metrics.properties and /etc/hbase/conf/hadoop-metrics.properties to announce Hadoop and HBase-related metric to Ganglia. Since we use CDH 4.0.1 which is compatible with Ganglia releases 3.1.x, we use newly introduced GangliaContext31 (instead olderGangliaContext class) in properties files.

Metrics configuration for slaves

# /etc/hadoop/conf/hadoop-metrics.properties
...
dfs.class=org.apache.hadoop.metrics.ganglia.GangliaContext31
dfs.period=10
dfs.servers=hadoop-slave1.IP.address:8649
...
mapred.class=org.apache.hadoop.metrics.ganglia.GangliaContext31
mapred.period=10
mapred.servers=hadoop-slave1.IP.address:8649
...

Metrics configuration for master

Should be the same as for slaves – just use hadoop-master.IP.address:8649 (instead of hadoop-slave1.IP.address:8649) for example:
# /etc/hbase/conf/hadoop-metrics.properties
...
hbase.class=org.apache.hadoop.metrics.ganglia.GangliaContext31
hbase.period=10
hbase.servers=hadoop-master.IP.address:8649
...
Remember to edit both properties files (/etc/hadoop/conf/hadoop-metrics.properties for Hadoop and /etc/hbase/conf/hadoop-metrics.properties for HBase) on all nodes and then restart Hadoop and HBase clusters. No further configuration is necessary.

Some more details

Actually, I was surprised that Hadoop’s deamons really send data somewhere, instead of just being polled for this data. What does it mean? It means, for example, that every single slave node runs several processes (e.g. gmond, datanode, tasktracker and regionserver) that collect the metrics and send them to gmond running on slave1 node. If we stop gmonds on slave2, slave3 and slave4, but still run Hadoop’s daemons, we will still get metrics related to Hadoop (but do not get metrics about memory, cpu usage as they were to be send by stopped gmonds). Please look at slave2 node in the picture bellow to see (more or less) how it works (tt, dd and rs denotes tasktracker, datanode and regionserver respectively, while slave4 was removed in order to increase readability).

Single points of failure

This configuration works well until nodes starts to fail. And we know that they will! And we know that, unfortunately, our configuration has at least two single points of failure (SPoF):
  • gmond on slave1 (if this node fails, all monitoring statistics about all slave nodes will be unavailable)
  • gmetad and the web frontend on master (if this node fails, the full monitoring system will be unavailable. It means that we not only loose the most important Hadoop node (actually, it should be called SUPER-master since it has so many master daemons installed ;), but we also loose the valuable source of monitoring information that may help us detect the cause of failure by looking at graphs and metrics for this node that were generated just a moment before the failure)

Avoiding Ganglia’s SPoF on slave1 node

Fortunately, you may specify as many udp_send_channels as you like to send metrics redundantly to other gmonds (assuming that these gmonds specify udp_recv_channels to listen to incoming metrics).
In our case, we may select slave2 to be also additional lead node (together with slave1) to collect metrics redundantly (and announce to them to gmetad
  • update gmond.conf on all slave nodes and define additional udp_send_channel section to send metrics to slave2 (port 8649)
  • update gmond.confs on slave2 to define udp_recv_channel (port 8649) to listen to incoming metrics and tcp_accept_channel (port 8649) to announce them (the same settings should be already set in gmond.confs on slave1)
  • update hadoop-metrics.properties file for Hadoop and HBase daemons running on slave nodes to send their metrics to both slave1 and slave2 e.g.:
# /etc/hbase/conf/hadoop-metrics.properties
...
hbase.class=org.apache.hadoop.metrics.ganglia.GangliaContext31
hbase.period=10
hbase.servers=hadoop-slave1.IP.address:8649,hadoop-slave2.IP.address:8649
  • finally update data_source “hadoop-slaves” in gmetad.conf to poll data from two redundant gmonds (if gmetad cannot pull the data from slave1.node.IP.address, it will continue trying slave2.node.IP.address):
data_source "hadoop-slaves" slave1.node.IP.address slave2.node.IP.address
Perhaps the picture bellow is not fortunate (so many arrows), but it intends to say that if slave1 fails, then gmetad will be able to take metrics from gmond on slave2 node (since all slave nodes send metrics redundantly to gmonds running on slave1 and slave2).

Avoiding Ganglia’s SPoF on master node

The main idea here is not to collocate gmetad (and the web frontend) with Hadoop master daemons, so that we will not loose monitoring statistics if the master node fails (or simply become unavailable). One idea is to, for example, move gmetad (and the web frontend) from slave1 to slave3 (or slave4) or simply introduce a redundant gmetad running on slave3 (or slave4). The former idea seems to be quite OK, while the later makes things quite complicated for such a small cluster.
I guess that even better idea is to introduce an additional node (called “edge” node, if possible) that runs gmetad and the web frontend (it may also have base Hadoop and HBase packages installed, but it does not run any Hadoop’s daemons – it acts as a client machine only to launch MapReduce jobs and access HBase). Actually, the “edge” node is commonly used practice to provide the interface between users and the cluster (e.g. it runs Pig and Hive, Oozie).

Troubleshooting and tips that may help

Since debugging various aspects of the configuration was the longest part of setting up Ganglia, I share some tips here. Note that is does not cover all possible troubleshooting, but it is rather based on problems that we have encountered and finally managed to solve.

Start small

Although the process configuration of Ganglia is not so complex, it is good to start with only two nodes and if it works, grew that to a larger cluster. But before, you install any Ganglia’s daemon…

Try to send “Hello” from node1 to node2

Make sure that you can talk to port 8649 on the given target host using UDP protocol. netcat is a simple tool, that helps you to verify it. Open port 8649 on node1 (called the “lead node” later) for inbound UDP connections, and then send some text to it from node2.
# listen (-l option) for inbound UDP (-u option) connections on port 8649 
# and prints received data
akawa@hadoop-slave1:~$ nc -u -l -p 8649
# create a UDP (-u option) connection to hadoop-slave1:8649 
# and send text from stdin to that node:
akawa@hadoop-slave2:~$ nc -u hadoop-slave1 8649
Hello My Lead Node
# look at slave1's console to see if the text was sucessfully delivered
akawa@hadoop-slave1:~$
Hello My Lead Node
If it does not work, please double check whether your iptables rules (iptables, or ip6tables if you use IPv6) opens port 8649 for both UDP and TCP connections.

Let gmond send some data to another gmond

Install gmond on two nodes and verify if one can send its metrics to another using UDP connection on port 8649. You may use following settings in gmond.conf file for both nodes:
cluster {
  name = "hadoop-slaves"
}
udp_send_channel {
  host = the.lead.node.IP.address
  port = 8649
}
udp_recv_channel {
  port = 8649
}
tcp_accept_channel {}
After running gmonds (sudo /etc/init.d/ganglia-monitor start), you can use lsof to check if the connection was established:
akawa@hadoop-slave1:~$ sudo lsof -i :8649
COMMAND   PID    USER   FD   TYPE    DEVICE SIZE/OFF NODE NAME
gmond   48746 ganglia    4u  IPv4 201166172      0t0  UDP *:8649 
gmond   48746 ganglia    5u  IPv4 201166173      0t0  TCP *:8649 (LISTEN)
gmond   48746 ganglia    6u  IPv4 201166175      0t0  UDP hadoop-slave1:35702->hadoop-slave1:8649
akawa@hadoop-slave2:~$ sudo lsof -i :8649
COMMAND   PID    USER   FD   TYPE    DEVICE SIZE/OFF NODE NAME
gmond   31025 ganglia    6u  IPv4 383110679      0t0  UDP hadoop-slave2:60789->hadoop-slave1:8649
To see if any data is actually sent to the lead node, use tcpdump to dump network traffic on port 8649:
akawa@hadoop-slave1:~$ sudo tcpdump -i eth-pub udp port 8649
tcpdump: verbose output suppressed, use -v or -vv for full protocol decode
listening on eth-pub, link-type EN10MB (Ethernet), capture size 65535 bytes
18:08:02.236625 IP hadoop-slave2.60789 > hadoop-slave1.8649: UDP, length 224
18:08:02.236652 IP hadoop-slave2.60789 > hadoop-slave1.8649: UDP, length 52
18:08:02.236661 IP hadoop-slave2.60789 > hadoop-slave1.8649: UDP, length 236

Use debug option

tcpdump shows that some data is transferred, but it does not tell you what kind of data is sent ;)
Hopefully, running gmond or gmetad in debugging mode gives us more information (since it does not run as a daemon in the debugging mode, so stop it simply using Ctrl+C)
akawa@hadoop-slave1:~$ sudo /etc/init.d/ganglia-monitor stop
akawa@hadoop-slave1:~$ sudo /usr/sbin/gmond -d 2
 
loaded module: core_metrics
loaded module: cpu_module
...
udp_recv_channel mcast_join=NULL mcast_if=NULL port=-1 bind=NULL
tcp_accept_channel bind=NULL port=-1
udp_send_channel mcast_join=NULL mcast_if=NULL host=hadoop-slave1.IP.address port=8649
 
 metric 'cpu_user' being collected now
 metric 'cpu_user' has value_threshold 1.000000
        ...............
 metric 'swap_free' being collected now
 metric 'swap_free' has value_threshold 1024.000000
 metric 'bytes_out' being collected now
 ********** bytes_out:  21741.789062
        ....
Counting device /dev/mapper/lvm0-rootfs (96.66 %)
Counting device /dev/mapper/360a980006467435a6c5a687069326462 (35.31 %)
For all disks: 8064.911 GB total, 5209.690 GB free for users.
 metric 'disk_total' has value_threshold 1.000000
 metric 'disk_free' being collected now
        .....
 sent message 'cpu_num' of length 52 with 0 errors
 sending metadata for metric: cpu_speed
We see that various metrics are collected and sent to host=hadoop-slave1.IP.address port=8649. Unfortunately, it only does not tell whether thy are delivered successfully since they were send over UDP…

Do not mix IPv4 and IPv6

Let’s have a look at a real situation, that we have encountered on our cluster (and which was the root cause of mysterious and annoying Ganglia misconfiguration). First, look at lsof results.
akawa@hadoop-slave1:~$ sudo  lsof -i :8649
COMMAND   PID    USER   FD   TYPE    DEVICE SIZE/OFF NODE NAME
gmond   38431 ganglia    4u  IPv4 197424417      0t0  UDP *:8649 
gmond   38431 ganglia    5u  IPv4 197424418      0t0  TCP *:8649 (LISTEN)
gmond   38431 ganglia    6u  IPv4 197424422      0t0  UDP hadoop-slave1:58304->hadoop-slave1:864913:56:33
akawa@ceon.pl: akawa@hadoop-slave2:~$ sudo  lsof -i :8649
COMMAND   PID    USER   FD   TYPE    DEVICE SIZE/OFF NODE NAME
gmond   23552 ganglia    6u  IPv6 382340910      0t0  UDP hadoop-slave2:36999->hadoop-slave1:8649
Here hadoop-slave2 sends metrics to hadoop-slave1 on right port and hadoop-slave1 listens to on right port as well. Everything is almost the same as at the snippets in the previous section, except one important detail – hadoop-slave2 sends over IPv6, but hadoop-slave1 reads over IPv4!
The initial guess was to update ip6tables (apart from iptables) rules to open port 8649 for both UDP and TCP connections over IPv6. But it did not work.
It worked when we changed hostname “hadoop-slave1.vls” to its IP addess in gmond.conf files (yes, earlier I used hostnames instead of IP addresses in every file).
Make sure, that your IP address is correctly resolved to a hostname, or vice versa.

Get cluster summary with gstat

If you managed to send send metrics from slave2 to slave1, it means your cluster is working. In Ganglia’s nomenclature, cluster is a set of hosts that share the same cluster name attribute ingmond.conf file e.g. “hadoop-slaves”. There is a useful provided by Ganglia called gstat that prints the list of hosts that are represented by a gmond running on a given node.
akawa@hadoop-slave1:~$ gstat --all
CLUSTER INFORMATION
       Name: hadoop-slaves
      Hosts: 2
Gexec Hosts: 0
 Dead Hosts: 0
  Localtime: Tue Aug 21 22:46:21 2012
 
CLUSTER HOSTS
Hostname                     LOAD                       CPU              Gexec
 CPUs (Procs/Total) [     1,     5, 15min] [  User,  Nice, System, Idle, Wio]
hadoop-slave2
   48 (    0/  707) [  0.01,  0.07,  0.09] [   0.1,   0.0,   0.1,  99.8,   0.0] OFF
hadoop-slave1
   48 (    0/  731) [  0.01,  0.06,  0.07] [   0.0,   0.0,   0.1,  99.9,   0.0] OFF

Check where gmetad polls metrics from

Run following command on the host that runs gmetad to check what clusters and host is it polling metrics from (you grep it somehow to display only useful lines):
akawa@hadoop-master:~$ nc localhost 8651 | grep hadoop
 
<GRID NAME="Hadoop_And_HBase" AUTHORITY="http://hadoop-master/ganglia/" LOCALTIME="1345642845">
<CLUSTER NAME="hadoop-masters" LOCALTIME="1345642831" OWNER="ICM" LATLONG="unspecified" URL="http://ceon.pl">
<HOST NAME="hadoop-master" IP="hadoop-master.IP.address" REPORTED="1345642831" TN="14" TMAX="20" DMAX="0" LOCATION="unspecified" GMOND_STARTED="1345632023">
<CLUSTER NAME="hadoop-slaves" LOCALTIME="1345642835" OWNER="ICM" LATLONG="unspecified" URL="http://ceon.pl">
<HOST NAME="hadoop-slave4" IP="..." REPORTED="1345642829" TN="16" TMAX="20" DMAX="0" LOCATION="unspecified" GMOND_STARTED="1345478489">
<HOST NAME="hadoop-slave2" IP="..." REPORTED="1345642828" TN="16" TMAX="20" DMAX="0" LOCATION="unspecified" GMOND_STARTED="1345581519">
<HOST NAME="hadoop-slave3" IP="..." REPORTED="1345642829" TN="15" TMAX="20" DMAX="0" LOCATION="unspecified" GMOND_STARTED="1345478489">
<HOST NAME="hadoop-slave1" IP="..." REPORTED="1345642833" TN="11" TMAX="20" DMAX="0" LOCATION="unspecified" GMOND_STARTED="1345572002">

Other issues (Last update: 2013-08-12)

Other issues that I saw using Ganglia are as follow:

Alternatives

Since the monitoring of clusters is quite broad topic, there are many tools that helps you with this task. In case of Hadoop clusters, apart from Ganglia, you can find a number of other interesting alternatives. I will just shortly mention a couple of them.

Cloudera Manager 4 (Enterprise)

Apart from greatly simplifing the process of installation and configuration of Hadoop cluster, Cloudera Manager provides a couple of useful features to monitor and visualize dozens of Hadoop’s service performance metrics and information related to hosts including CPU, memory, disk usage and network I/O. Additionally, it alerts you when you approach critical thresholds (Ganglia itself does not provide alerts, but can be integrated with alerting systems such as Nagios and Hyperic).
You may learn more about the key features of Cloudera Manager here.

Cacti, Zabbix, Nagios, Hyperic

Please visit Cacti website to learn more about this tool. Here is also very interesting blog post aboutHadoop Graphing with Cacti.
Zabbix, Nagios and Hyperic are tools you may also want to look at.


Related Posts Plugin for WordPress, Blogger...