Introduction
While developing a software, knowing how to debug the code is the most important part. It helps to solve any bugs in the code easily as well as helps us understand the internals of dependent framework code. It definitely applies to Apache Pig scripting. In this blog i will explain how to Code , Debug & Test Apache Pig Scripts using Eclipse on Windows.
Prerequisites:
- Install Eclipse Juno or above
- Install m2eclipse plugin
- Install JDK 1.6 or above
- Install Cygwin 1.7.5 or above
- <CYGWIN_HOME>/bin folder is added into PATH environment variable. CYGWIN_HOME is the installation directory of cygwin.
Steps:
Before you start with following steps, make sure all prerequisites are met.
1. Start Eclipse
2. From Eclipse File menu, create a new project.
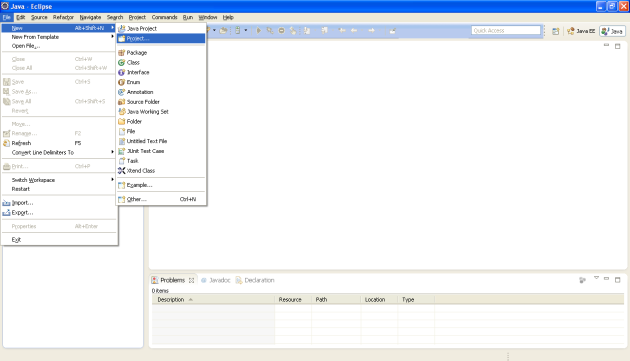
3. From New Project wizard, select Maven project and click on Next button.
4. On New Maven Project screen, click on next button
5. Select “maven-archtype-quicktype” as the project archtype and click on Next button.
6. Enter appropriate Group Id, Artifact Id, Version & Package name and click on Finish button.
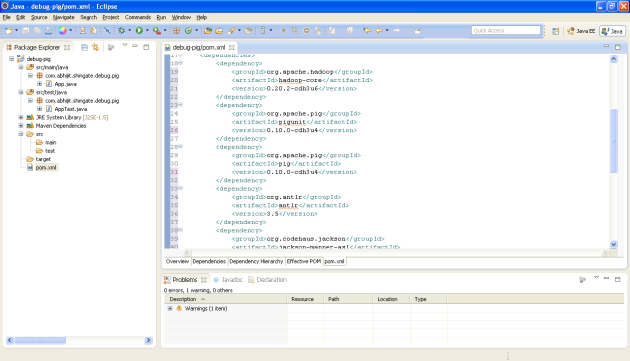
7. It creates a maven project which is shown in the package explorer. I have just expanded the project to show its structure. Project consists of auto generated App.java file and its corresponding AppTest.java file. AppTest.java contains the junit test code inside it. Also there is a file named pom.xml. It is a maven metadata file.
8. Double click on pom.xml to open it in POM editor.
9. Click on the pom.xml tab in the POM editor to see the contents of pom.xml
10. Add cloudera repository information to the pom.xml. We need some important dependencies for this project (e.g. pig, pigunit & hadoop). These dependencies are available as maven artifacts in the cloudera’s maven repository.
| 123456789101112 |
<repositories>

 <repository>

  <id>cloudera-releases</id>

  <url>https://repository.cloudera.com/artifactory/cloudera-repos</url>

  <releases>

   <enabled>true</enabled>

  </releases>

  <snapshots>

   <enabled>false</enabled>

  </snapshots>

 </repository>

</repositories>
|
11. Add dependencies on pig, pigunit, hadoop and some other dependencies like antlr, jackson etc. We are going to debug pig scripts in the Eclipse. For that purpose we need pig and pigunit. Because pig requires hadoop-core to work, we also need to add dependency on hadoop-core.
| 12345678910111213141516171819202122232425262728293031 |
<dependency>

 <groupId>org.apache.hadoop</groupId>

 <artifactId>hadoop-core</artifactId>

 <version>0.20.2-cdh3u6</version>

</dependency>

<dependency>

 <groupId>org.apache.pig</groupId>

 <artifactId>pigunit</artifactId>

 <version>0.10.0-cdh3u4</version>

</dependency>

<dependency>

 <groupId>org.apache.pig</groupId>

 <artifactId>pig</artifactId>

 <version>0.10.0-cdh3u4</version>

</dependency>

<dependency>

 <groupId>org.antlr</groupId>

 <artifactId>antlr</artifactId>

 <version>3.5</version>

</dependency>

<dependency>

 <groupId>org.codehaus.jackson</groupId>

 <artifactId>jackson-mapper-asl</artifactId>

 <version>1.9.12</version>

</dependency>

<dependency>

 <groupId>junit</groupId>

 <artifactId>junit</artifactId>

 <version>3.8.1</version>

 <scope>test</scope>

</dependency>
|
12. While debugging we also need the source core and javadoc of dependencies. To enable downloading of source code and javadoc of dependencies, go to menu Window > Preferences > Maven.
13. Select the checkboxes for Download Artifact Sources and Download Artifact JavaDoc. Click on Apply and then OK. After this m2eclipse plugin downloads the sources and JavaDoc and attaches them to the artifact jar.
14. Right click on main folder and create a new folder under it.
15. Name the newly created folder as resources.
16. In resources folder, create two files named wordcount.pig and sample.data. Inwordcount.pig file, we are going to write a pig code that will count the number of occurrences of each word present in the sample.data file.
17. Add data into sample.data file.
| 12345678 |
Johny, Johny!

Yes, Papa

Eating sugar?

No, Papa

Telling lies?

No, Papa

Open your mouth!

Ha! Ha! Ha!
|
18. Add pig code in the wordcount.pig file.
| 12345 |
A = load 'src/main/resources/sample.data';

B = foreach A generate flatten(TOKENIZE((chararray)$0)) as word;

C = group B by word;

D = foreach C generate COUNT(B), group;

dump D;
|
19. Now we need to add pig unit test case to test and debug this wordcount.pig file.
20. Double click on the AppTest.java file to open in Java Editor.
21. Open AppTest.java file. Remove all the existing functions from the AppTest class. And add testWordCountScript fucntion.
| 1234567 |
public void testStudentsPigScript() throws Exception {

 PigTest pigTest = new PigTest("src/main/resources/wordcount.pig");

 pigTest.assertOutput("D", new String[] { "(2,No)", "(3,Ha!)",

   "(1,Yes)", "(1,Open)", "(3,Papa)", "(1,your)", "(1,Johny)",

   "(1,lies?)", "(1,Eating)", "(1,Johny!)", "(1,mouth!)",

   "(1,sugar?)", "(1,Telling)", });

}
|
22. As we are going to run pig code in the eclipse, we need to use larger heap while running pig unit test case.
23. To do that, select the AppTest.java file. Go to menu Run > Run Configurations …
24. In Run Configurations window, double click on JUnit to create a Run Configuration for AppTest
25. Go to Arguments tab and in the VM arguments section add “-Xmx1024m” to set the max JVM heap to 1Gb.
26. Again Select the AppTest.java file. Go to menu Run > Debug Configurations …
27. Select AppTest and click on Debug
28. Test case should execute successfully and a green bar is shown.
29. Now we want to debug COUNT udf. To do that, press Ctrl+Shift+T which is a Eclipse shortcut to open a class. In the Open Type window, Type COUNT in the first text field. This will automatically show all the classes related to name COUNT. We are interested in the COUNT class present under package org.apache.pig.builtin. Select that COUNT class. And click on the OK button.
30. Because we have enabled attachment of source to the jar, the source code of COUNT udf is shown in the java editor.
31. Because COUNT is a aggregate UDF, it contain implementation for Initial, Intermed & Final states. We will just put debug breakpoint in all these three state implementations exec function.
32. Again Select the AppTest.java file. Go to menu Run > Debug Configurations …
33. Select AppTest and click on Debug
34. A dialog box “Confirm Perspective Switch” will appear. Click on Yes button.
35. You can see the activate breakpoint in the Java editor. Now by using Eclipse debug functionality you can debug the complete COUNT udf.
36. Now you are ready to debug any UDF code or even pig code.
Hope it helps!


