Apache Spark – a Fast Big Data Analytics Engine
Introduction
There are different approaches in big data world to make Hadoop more suitable for ad-hoc, interactive queries and iterative data processing. As it is very well known, Hadoop MapReduce framework is primarily designed for batch processing and that makes it less suitable for ad-hoc data exploration, machine learning processes and the like. Big data vendors are trying to address this challenge by replacing MaReduce with alternatives. In case of SQL on Hadoop, there are various initiatives; Cloudera Impala, Pivotal HAWQ orHortonworks Stinger initiative that aims to improve Hive performance significantly.
Apache Spark is another increasingly popular alternative to replace MapReduce with a more performant execution engine but still use Hadoop HDFS as storage engine for large data sets.
Spark Architecture
From architecture perspective Apache Spark is based on two key concepts; Resilient Distributed Datasets (RDD) and directed acyclic graph (DAG) execution engine. With regards to datasets, Spark supports two types of RDDs: parallelized collections that are based on existing Scala collections and Hadoop datasets that are created from the files stored on HDFS. RDDs support two kinds of operations: transformations and actions. Transformations create new datasets from the input (e.g. map or filter operations are transformations), whereas actions return a value after executing calculations on the dataset (e.g. reduce or count operations are actions).
The DAG engine helps to eliminate the MapReduce multi-stage execution model and offers significant performance improvements.
The DAG engine helps to eliminate the MapReduce multi-stage execution model and offers significant performance improvements.
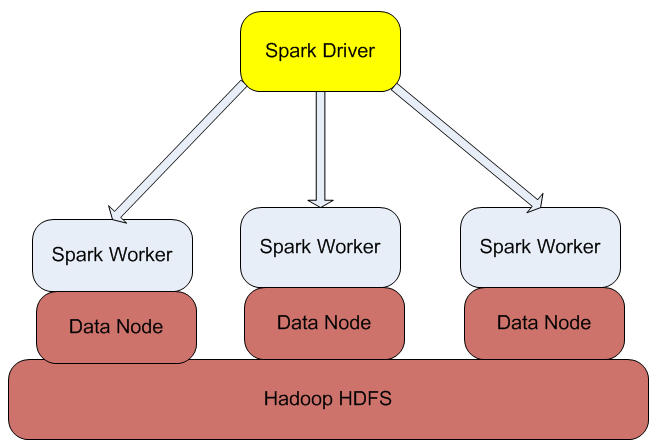
Figure 1: Spark Architecture
Installing Spark
Spark is written in Scala so before you install Spark, you need to install Scala. Scala binaries can be downloaded from http://www.scala-lang.org.
$ wget http://www.scala-lang.org/files/archive/scala-2.10.4.tgz
$ tar xvf scala-2.10.4.tgz
$ ln -s scala-2.10.4 scala
$ vi .bashrc
export SCALA_HOME=/home/istvan/scala
export PATH=$SCALA_HOME/bin:$PATH
You can validate your Scala installation by running Scala REPL (Scala command line interpreter), below is an example how to execute the classic HelloWorld program from Scala:
$ scala
Welcome to Scala version 2.10.4 (Java HotSpot(TM) 64-Bit Server VM, Java 1.6.0_32).
Type in expressions to have them evaluated.
Type :help for more information.

scala> object HelloWorld {
     |     def main(args: Array[String]) {
     |         println("Hello, world!")
     |     }
     | }
defined module HelloWorld

scala> HelloWorld.main(null)
Hello, world!
Then you can download Spark binaries from http://spark.apache.org/downloads.html. There are a couple of pre-compiled versions depending on your Hadoop distribution; we are going to use Spark binaries built for Cloudera CDH4 distribution.
$ wget http://d3kbcqa49mib13.cloudfront.net/spark-0.9.0-incubating-bin-cdh4.tgz
$ tar xvf spark-0.9.0-incubating-bin-cdh4.tgz
$ ln -s spark-0.9.0-incubating-bin-cdh4 spark
Using Spark shell
Now we are ready to run Spark shell which is a command line interpreter for Spark:
$ bin/spark-shell
14/03/31 15:54:51 INFO HttpServer: Using Spark's default log4j profile: org/apache/spark/log4j-defaults.properties
14/03/31 15:54:51 INFO HttpServer: Starting HTTP Server
Welcome to
      ____              __
     / __/__  ___ _____/ /__
    _\ \/ _ \/ _ `/ __/  '_/
   /___/ .__/\_,_/_/ /_/\_\   version 0.9.0
      /_/

Using Scala version 2.10.3 (Java HotSpot(TM) 64-Bit Server VM, Java 1.6.0_32)
Type in expressions to have them evaluated.
Type :help for more information.
....
14/03/31 15:54:59 INFO HttpServer: Starting HTTP Server
...
Created spark context..
Spark context available as sc.

scala>
In our example we are going to process Apache weblogs that support the common logfile format having the following fields: hostname, timestamp, request, HTTP status code and number of bytes. The test file that we are using in this example is based on the public NASA weblog from 1995 August, see http://ita.ee.lbl.gov/html/contrib/NASA-HTTP.html. The file was cleaned and modified to support tab separated format.
Let us assume that you want to count how many hits the NASA web server got in August, 1995. In order to get the result, you can run the following commands in spark-shell:
Spark context available as sc.

scala> val accessLog = sc.textFile("hdfs://localhost/user/cloudera/weblog/NASA_access_log_Aug95")
14/03/31 16:18:16 INFO MemoryStore: ensureFreeSpace(82970) called with curMem=0, maxMem=311387750
14/03/31 16:18:16 INFO MemoryStore: Block broadcast_0 stored as values to memory (estimated size 81.0 KB, free 296.9 MB)
accessLog: org.apache.spark.rdd.RDD[String] = MappedRDD[1] at textFile at :12

scala> accessLog.count()
14/03/31 16:18:24 INFO FileInputFormat: Total input paths to process : 1
14/03/31 16:18:24 INFO SparkContext: Starting job: count at :15
14/03/31 16:18:24 INFO DAGScheduler: Got job 0 (count at :15) with 2 output partitions (allowLocal=false)
...
14/03/31 16:18:26 INFO HadoopRDD: Input split: hdfs://localhost/user/cloudera/weblog/NASA_access_log_Aug95:134217728+27316431
..
14/03/31 16:18:26 INFO SparkContext: Job finished: count at :15, took 2.297566932 s
res0: Long = 1569898
The first command creates an RDD from the NASA Apache access log stored on HDFS (hdfs://localhost/user/cloudera/weblog/NASA_access_log_Aug95). The second command (an action executed on the accessLog RDD) will count the number of lines in the file. Note that the execution time is around 2 seconds.
If you are interested to know how many requests were initiated from one particular server (e.g. beta.xerox.com in our example), you need to execute a filter operation and then you run count action on the filtered dataset, see:
scala> val filteredLog = accessLog.filter(line => line.contains("beta.xerox.com"))

filteredLog: org.apache.spark.rdd.RDD[String] = FilteredRDD[2] at filter at :14

scala> filteredLog.count()
14/03/31 16:19:35 INFO SparkContext: Starting job: count at :17
14/03/31 16:19:35 INFO DAGScheduler: Got job 1 (count at :17) with 2 output partitions (allowLocal=false)
...
14/03/31 16:19:35 INFO Executor: Running task ID 2
...
14/03/31 16:19:35 INFO HadoopRDD: Input split: hdfs://localhost/user/cloudera/weblog/NASA_access_log_Aug95:0+134217728
14/03/31 16:19:36 INFO Executor: Serialized size of result for 2 is 563
1...
14/03/31 16:19:36 INFO HadoopRDD: Input split: hdfs://localhost/user/cloudera/weblog/NASA_access_log_Aug95:134217728+27316431
...
14/03/31 16:19:37 INFO DAGScheduler: Stage 1 (count at :17) finished in 1.542 s
14/03/31 16:19:37 INFO SparkContext: Job finished: count at :17, took 1.549706892 s
res1: Long = 2318
You can also execute more complex logic and define your own functions, thanks to Scala language capabilities. Let us assume that we need to calculate the total number of bytes generated by the given NASA web server in August, 1995. The number of bytes is the last (5th) field in the lines in the weblog file and unfortunately, there are cases when the field is ‘-‘, not an integer value as it would be expected. The standard toInt Scala String function throws an exception if you want to convert a non-numeric value into Integer. Thus we need to be able to identify whether a given string is a number or not and if not, we need to return 0. This requires a custom function (convertToInt) that will extend the standard String Scala class and will be made available for the String data type. Then we can use this custom function and the Spark standard RDD operations to calculate the total number of bytes generated by the NASA webserver.
scala> def isNumeric(input: String): Boolean = input.forall(_.isDigit)
isNumeric: (input: String)Boolean


scala> class StringHelper(s:String) {
     |    def convertToInt():Int = if (isNumeric(s)) s.toInt else 0
     | }
defined class StringHelper


scala> implicit def stringWrapper(str: String) = new StringHelper(str)
warning: there were 1 feature warning(s); re-run with -feature for details
stringWrapper: (str: String)StringHelper


scala> "123".convertToInt
res2: Int = 123

scala> "-".convertToInt
res4: Int = 0

scala> accessLog.map(line=>line.split("\t")).map(line=>line(4).convertToInt).sum39 INFO SparkContext: Starting job: sum at :21
14/04/01 13:12:39 INFO DAGScheduler: Got job 2 (sum at :21) with 2 output partitions (allowLocal=false)
...
14/04/01 13:12:40 INFO HadoopRDD: Input split: hdfs://localhost/user/cloudera/weblog/NASA_access_log_Aug95:0+134217728
...
14/04/01 13:12:45 INFO SparkContext: Job finished: sum at :21, took 5.53186208 s
res4: Double = 2.6828341424E10
As you can see, the result is 26,8GB and the calculation was executed in 5.5 seconds.
Programming Spark
In addition to spark-shell that can be used to execute operations interactively, you can also write and build your code using Scala, Java or Python programming languages. Let us take an example how you can implement your weblog application in Scala.
In order to build your application, you need to follow the directory structure as shown below:
./
./simple.sbt
./src/main/scala/WeblogApp.scala
./project/build.properties
./sbt
You can copy sbt build tool from your Spark home directory (cp -af $SPARK_HOME/sbt/* ./sbt).
The simple.sbt build file should look something like this:
name := "Weblog Project"

version := "1.0"

scalaVersion := "2.10.4"

libraryDependencies += "org.apache.spark" %% "spark-core" % "0.9.0-incubating"

resolvers += "Akka Repository" at "http://repo.akka.io/releases/"

libraryDependencies += "org.apache.hadoop" % "hadoop-client" % "2.0.0-cdh4.4.0"
And the WeblogApp.scala code is as follows:
import org.apache.spark._

object WeblogApp {
    def main(args: Array[String]) {
        val file = "hdfs://localhost/user/cloudera/weblog/NASA_access_log_Aug95";
        val sc = new SparkContext("local", "WeblogApp",
                                  System.getenv("SPARK_HOME"),
                                  SparkContext.jarOfClass(this.getClass))
        val accessLog = sc.textFile(file)

        println("Number of entries: " + accessLog.count())
    }
}
Then you can build and run the application using the Scala sbt build tool:
$ sbt/sbt package
$ sbt/sbt run
Launching sbt from sbt/sbt-launch-0.12.4.jar
[info] Loading project definition from /home/istvan/project
[info] Set current project to Weblog Project (in build file:/home/istvan/)
[info] Running WeblogApp
...
14/04/01 14:48:58 INFO SparkContext: Starting job: count at WeblogApp.scala:12
14/04/01 14:48:58 INFO DAGScheduler: Got job 0 (count at WeblogApp.scala:12) with 2 output partitions (allowLocal=false)
...
14/04/01 14:49:01 INFO SparkContext: Job finished: count at WeblogApp.scala:12, took 2.67797083 s
Number of entries: 1569898
14/04/01 14:49:01 INFO ConnectionManager: Selector thread was interrupted!
[success] Total time: 9 s, completed 01-Apr-2014 14:49:01
Conclusion
Apache Spark has started gaining significant momentum and considered to be a promising alternative to support ad-hoc queries and iterative processing logic by replacing MapReduce. It offers interactive code execution using Python and Scala REPL but you can also write and compile your application in Scala and Java. There are various tools running on top of Spark such as Shark (SQL on Hadoop), MLib (machine learning), Spark Streaming and GraphX.It will be interesting to see how it evolves.